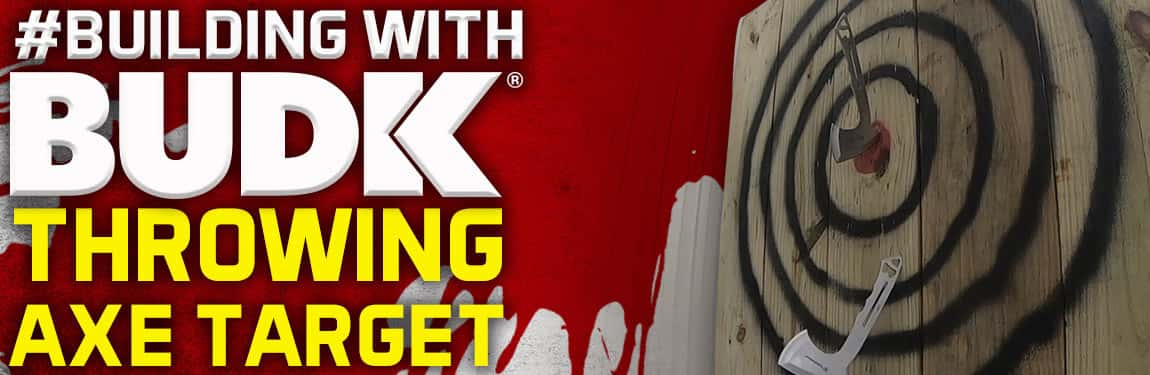
Build An Axe-Throwing Target
By Adelia Ladson
With the popularity of axe-throwing on the rise, we wanted to see just how easy it would be to build our own axe-throwing target. And guess what? It was ridiculously quick and easy! Have fun!
The most important thing about building and setting up a target is that it is unquestionably sturdy and secure and that it is in a location away from human traffic. Axe-throwing is inherently dangerous if strict precautions are not taken and followed. There’s no better way to ruin a friendly backyard hobby than by having a serious mishap take place.
The first key to safety in building a target is that thick enough material is used and sturdily supported, so that the target won’t act as a springboard where the axe bounces back instead of sticking.
When using planks or sheets of wood, they must be a minimum of 1 1/2” thick. Anything less doesn’t give enough penetration room or stability. The wood used needs to be softer because harder wood like oak can cause bounce back rather than a solid stick into the target. Some good choices are cottonwood, pine, palm, spruce and poplar.
Round tree slices also make good target materials, fir being the best choice, and letting the wood get soaked allows the axes to stick better. A great property of cottonwood is that when it soaks in moisture, the holes will seal up a little bit when the axes are pulled out. The American Knife Throwers Alliance (AKTA) uses log rounds that are 16” in diameter.
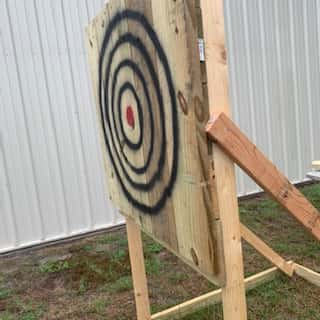
One of the easiest targets to build is just constructed out of planks lined up, vertically, next to each other and tied securely together across the back with more planks and screws. Keep in mind, since axes spin vertically, it’s important that the grain of the wood should also run vertically because this allows the wood to “open up” for the axe. The plank target should be at the very least 3’ wide and extend from the ground to about 10” above eye level.
 |
 |
 |
 |
|
|
|
|
- 4 treated pine 2x4’s cut to 7’ (two upright and two support boards)
- 2 treated pine 2x4’s cut to 6’ (leg boards)
- 2 treated pine 2x4’s cut to 3 3/4' (back brace and front brace)
- 10 treated pine 2x10’s cut to 3 3/4' (five back boards and five target boards)
- 3” Screws (a minimum of 60)
- Power drill
- Red and black spray paint
Here are the steps:
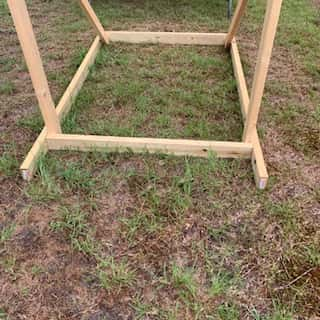
- Place the two leg boards down with the edge side up and place the back brace with the edge side up, spanning the distance between them, flush against each end. Put two screws in each end, connecting the leg boards with the back brace. This is the target’s base, put to the side.
- Place the two upright boards down with the edge side up and place the front brace with each end lying flat and flush on the end of an upright board, so that it’s spanning the distance between them. Put two screws into each end of the front brace, down into the upright boards. This is the target’s frame.
- Begin laying the five back boards, across the frame, horizontally, flush from the top of the upright boards on the open end of the frame. Put two screws in each end of a back board, securing them to the frame.
- Lay the five target boards, vertically, across the horizontal back boards, lining them up flush with the top of the frame and top backboard. Secure them with two screws each at the top and bottom of each board. Make sure that the target boards are tightly aligned with each other so that there are no gaps across the front of your target.
- Stand the target and frame up on its front brace and place it 12” from the open end of the base, between the two leg boards. Put two screws into each upright board going into each leg board and two screws into each leg board going into the front brace.
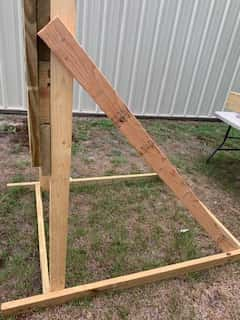
- To further stabilize your target, attach a support board, on the diagonal, extending from inside corner of each leg board and back brace on the base to the outside of each upright board on the frame. Two screws at each juncture should do it.
- The last thing is to spray paint your target circles and you’re ready to go!
Once the target is built, make sure it’s set up in a location that is well away from other activities that may be happening in the backyard. A back corner is probably the best bet, especially, if it’s a free-standing target. That way, it decreases the chance of someone (a child) getting behind it.
You can check out our crew building this axe-throwing target for our backyard below. In the video, you can also see the Smith & Wesson Hawkeye Throwing Axe Set in action. It’s a set of three throwing axes, each with a built-in bottle opener, so that you can enjoy a fun night of axe throwing with friends. With perfectly balanced frames and a sharpened edge on three sides, you’re bound to hit the bullseye every time.